Dimension Extraction In Common Image Formats
Nov 14, 2025
30 min
Most image formats are both compressed and encoded into raw bytes. Compression helps with reducing the size needed to store the image while encoding defines the layout of how the bytes are organized. Because computers need the original data to render an image, these formats must be decoded and decompressed before use. Luckily,most common image formats publish specifications detailing everything from their compression methods to their data layout. Thus, unless it’s some proprietary format, we can follow the specification to extract the width and height of an image from different formats. In this article I will specifically be covering: PNG, JPEG, WEBP formats.
While image formats differ in many aspects (i.e. compression algorithms used), there are some notable commonalities in structure:
- File signature: each image format has a special file signature, typically the first couple of bytes of the image.
- Headers: image formats must store certain “headers” like width and height of the canvas in order to properly render the image.
- Metadata: extra information about the image like device used; not all image formats support storing metadata.
- Pixel data: actual raw pixel data of the image (nearly always in compressed form).
Note: Metadata extraction is a separate challenge altogether, since metadata can appear in several formats (Exif, XMP, and others). Covering it properly would require explaining both the metadata format and the image format, so I won’t be discussing metadata parsing in this article. Also, to keep the code snippets in this article concise, errors and validation won’t be handled. In real world projects, be sure to have fallbacks for when parsing or file I/O operations run into issues!
PNG
PNG is a lossless compression image format that uses the DEFLATE algorithm. The original PNG 1.0 specification can be found in RFC 2083, although there have been some updates with the most recent being PNG 3.0. The specification is maintained by the PNG Working Group under the World Wide Web Consortium (W3C).
Structure
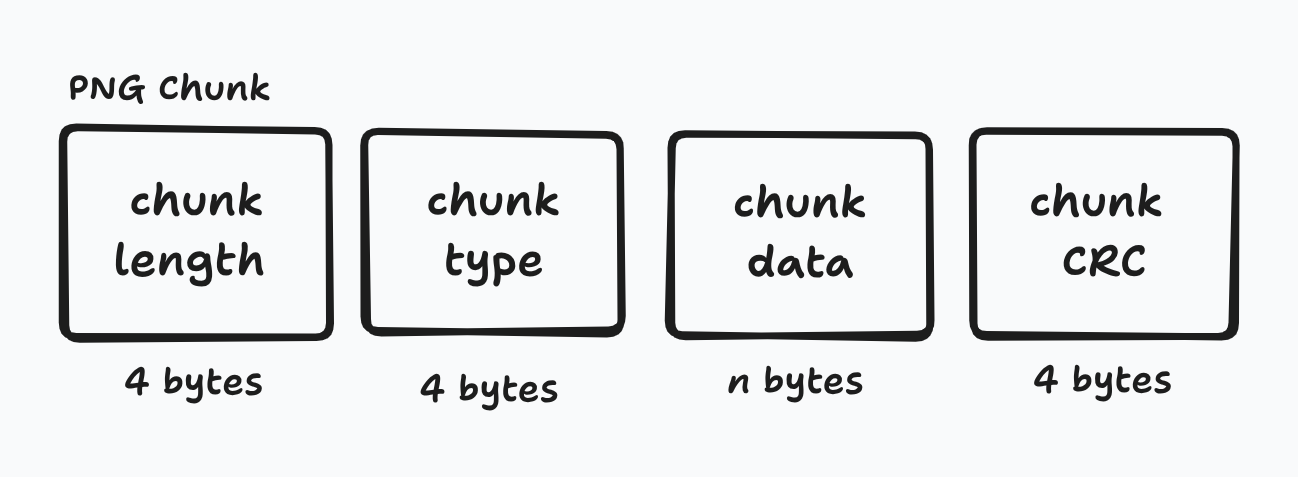
The structure of a PNG is fairly simple. There’s an initial 8 byte file signature with the rest of the PNG split into chunks. Chunks contain the following:
- 4 bytes for the length of the chunk
- 4 bytes for the type/name of the chunk
- n bytes for the data contained
- 4 bytes for cyclic redundancy code (CRC).
There are two types of chunks: critical and ancillary. Critical chunks are required for machines to be able to render an image. If any critical chunk is missing, programs won’t be able to load the image. PNG has the following critical chunks (remember chunks are identified with a 4 byte name):
- IHDR: defines the width, height, bit depth, color type, compression method, filter method, interlace method
- PLTE: contains a list of colors; optional for color types 2 and 6
- IDAT: contains image data; must have at least 1
- IEND: marks the end of the image
A couple of rules when it comes to the ordering of the critical chunks:
- IHDR must be the first chunk after the file signature
- PLTE must appear before the first IDAT chunk if required
- All IDAT chunks must be placed consecutively
- IEND must be the last chunk of the file
Ancillary chunks are user defined and thus isn’t required. Programs can define a custom handler to process special ancillary chunks and if it’s an ancillary chunk the program doesn’t know, then it can simply ignore it. Some common ancillary chunks include the following:
- dSIG: stores digital signatures
- bKGD: default background color
- eXIf: stores Exif metadata
- tIME: stores time that the image was last modified

Parsing
The image width and height are stored in the IHDR chunk. The IHDR chunk is 25 bytes long:
- 4 bytes for chunk length (IHDR always has a length of 13 bytes)
- 4 bytes for chunk type (IHDR)
- 13 data bytes
- 4 bytes for CRC
Within the 13 data bytes, the first 4 bytes correspond to the width and the next 4 correspond to the height.
void printImageDimension(std::string filePath) {
  std::ifstream input_file(filePath, std::ios::binary);
  int bytesToRead = 8 + 25; // file signature + full IHDR chunk
  std::vector<uint8_t> byteData(bytesToRead);
  input_file.read(reinterpret_cast<char *>(byteData.data()), bytesToRead);

  std::vector<uint8_t> widthData(byteData.begin() + 16,
                                 byteData.begin() + 20);
  std::vector<uint8_t> heightData(byteData.begin() + 20,
                                  byteData.begin() + 24);

  int width = bytes_to_int_bitwise(widthData);
  std::cout << width << "\n";
  int height = bytes_to_int_bitwise(heightData);
  std::cout << height << "\n";
}Note: Code snippet DOESN’T check that the image is a valid PNG image!
Note: bytes_to_int_bitwise is a helper function that converts bytes to int type using big endian
JPEG
Whew, strap in because JPEG is much more complex and nuanced compared to PNG. JPEG, also commonly referred to as JPG, has a bit of a storied background. The specification was developed during the late 1980s and features different research papers and patents. There was a bit of drama around patents, licensing, and ownership, but I honestly don’t give a shit. You can read about it on your own if you’re interested.
The first published standard was in 1992 under ITU-T Recommendation T.81 and later on as ISO/IEC 10918-1 in 1994. The specification is split into parts, each covering a different related topic. The original JPEG standard (ISO/IEC 10918-1) specifies the JPEG Interchange Format (JIF) that defines the base structure for the compressed data. However, JIF doesn’t mandate important information like color space and image resolution. As such, the JPEG File Interchange Format (JFIF) was developed on top of JIF. JFIF became the de facto standard used with JPEG images and later on in 2011, was added to part 5 of the JPEG standard as the official file format.
Important to note that many capture devices (like digital cameras) output JPEG images using the Exif format. Exif is the metadata interchange standard that the camera industry uses. However, since the Exif standard doesn’t specify color profiles, most image editing software use JPEG in the JFIF format. Exif and JFIF are technically incompatible since each format specifies that it needs to precede the other, but usually for ease-of-use JFIF segments precede Exif headers. Yeah… I know 🙃. The saving grace is that while you still need separate parsers for both JFIF and Exif segments, the image data is still the same so at least you don’t need to have separate decoders.
Structure
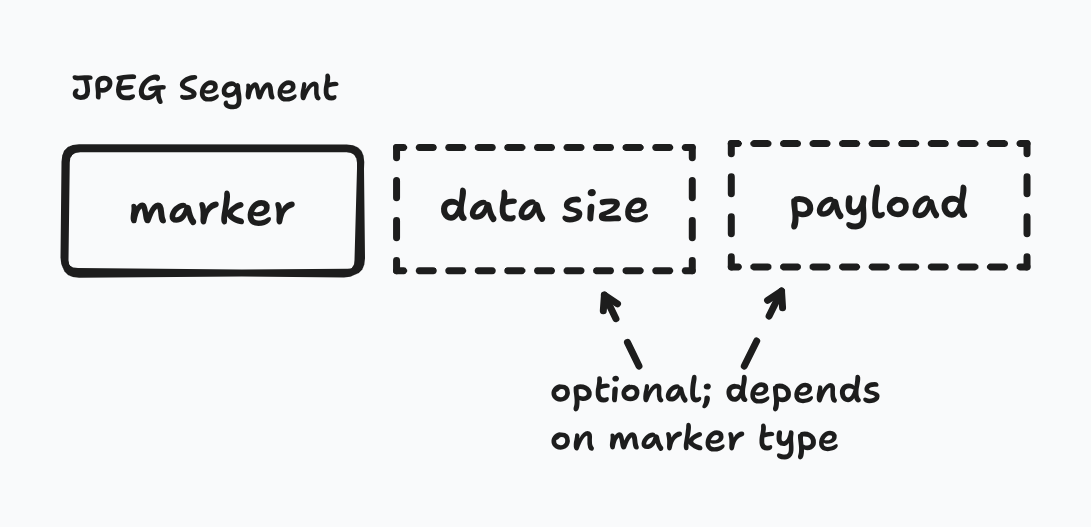
Similar to how PNG organizes data into chunks, JPEG has segments each containing a marker. These markers serve as the identifier for what type of data is contained within the segment. Markers are 2 bytes with the first byte always being 0xFF. Additionally, some markers might be followed by 2 additional bytes that specify the length of the entire segment (payload included).
The following markers are needed for creating a barebones JPEG file:
- Start Of Image (SOI): marks the start of the data stream
- Application-specific (APPn): indicates underlying file format and other format-specific information like pixel density
- Define Quantization Table (DQT): contains quantization tables needed to decode the image data
- Start Of Frame (SOFn): indicates the encoding process and defines core image parameters
- Define Huffman Table (DHT): contain Huffman tables used for entropy coding the image data
- Start Of Scan (SOS): indicates the start of the actual image data
- End Of Image (EOI): marks the end of the data stream
You might’ve noticed that some markers have an n next to them. n is just a placeholder for another value because there are multiple types of those markers. For example, APP0 means that the image is using JFIF as the underlying file format while APP1 means that it’s using the Exif format. Similarly, SOF0 means that the encoding type is sequential while SOF2 indicates that the encoding type is progressive. Also important to note that while n can technically be anything from 0 to F, there are possible conflicts that cause the n to “skip” a sequential value. For example, there are SOFn values from SOF0 to SOF3, but the next marker type starts at SOF5 since the bytes associated with SOF4 exist as a separate marker.
We previously discussed how even though there can technically only be one primary APPn marker per image, that’s more of a suggestion rather than an enforced standard. SOFn is different though. There can’t be more than one type of SOFn marker as the decoder won’t know which type of decoding to use. That being said, sometimes digital cameras embed JPEG thumbnails within their APPn marker, so technically there can be multiple SOI, APPn, SOFn, etc. within a single JPEG file. This detail is important as you want to map the markers to their respective images for the images to be rendered correctly.
Another note on JPEG: the file signature is 4 bytes composed of the SOI and APPn marker. Since APPn is variable, JPEG can have multiple valid signatures indicating which file format is used. Below is an image of the general format of JPEG in chronological order.
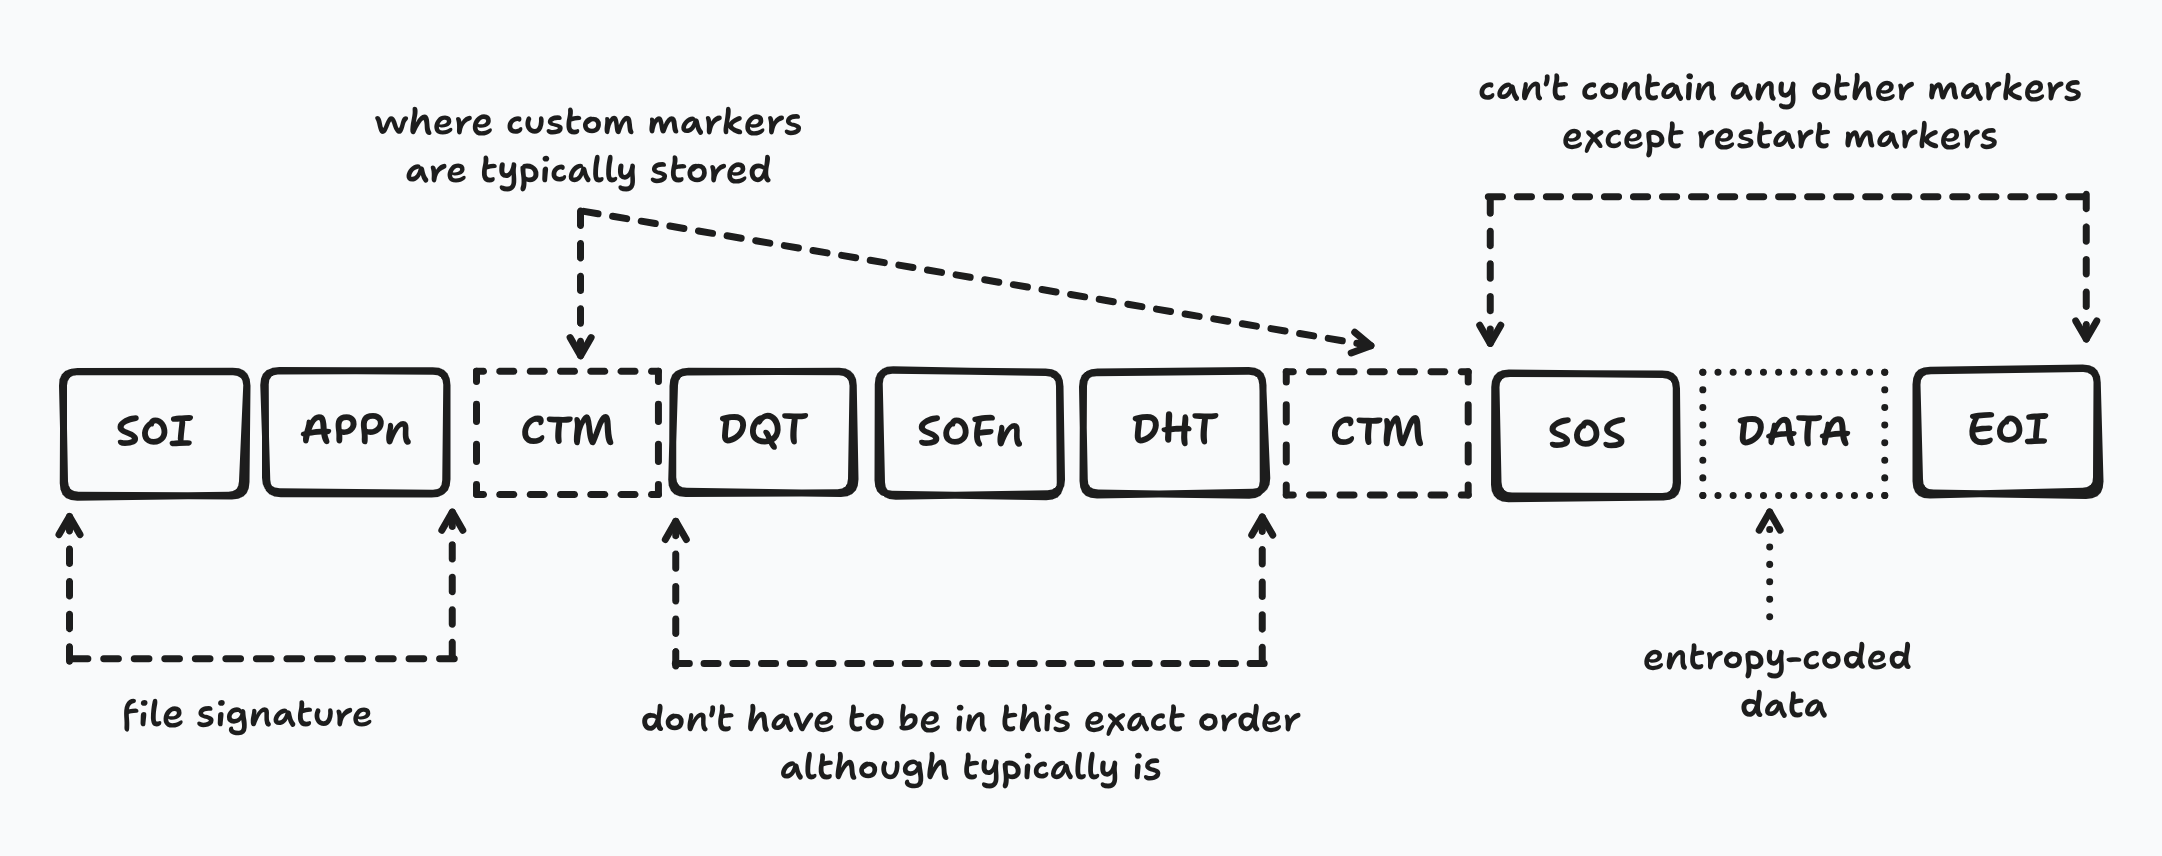
As shown in the image:
- SOI and APPn must be first two markers
- DQT, SOFn, and DHT must be before SOS
- Between SOS and EOI, it may only contain restart markers (RST0 to RST7)
- Custom markers can be pretty much anywhere between first APPn and SOS
Parsing
Width and height are contained in the SOFn marker. SOFn can range from 0-3, 5-7, 9-11, 13-15. There can also be multiple SOFn markers in a single JPEG due to thumbnails. As such, our program needs to read the data sequentially, skip all APPn markers until the first SOFn marker is reached. The height and width are bytes 1-3 and 3-5 of the payload respectively (offset of 5 bytes starting from the marker).
void printImageDimension(std::string filePath) {
  std::ifstream input_file(filePath, std::ios::binary);
  std::unordered_set<uint8_t> sof_markers({0xC0, 0xC1, 0xC2, 0xC3, 0xC5, 0xC6,
                                           0xC7, 0xC9, 0xCA, 0xCB, 0xCD, 0xCE,
                                           0xCF});
  std::vector<uint8_t> buffer(2);

  while (input_file.read(reinterpret_cast<char *>(buffer.data()), buffer.size())) {
    // markers always start with 0xFF
    if (buffer.at(0) == 0xFF) {
      // if it's a start of frame marker
      // store the payload in buffer
      if (sof_markers.find(buffer.at(1)) != sof_markers.end()) {
        input_file.read(reinterpret_cast<char *>(buffer.data()), buffer.size());
        int payload_size = bytes_to_int_bitwise(buffer) - 2;
        buffer.resize(payload_size);
        input_file.read(reinterpret_cast<char *>(buffer.data()), buffer.size());
        break;
      }
    } else {
      // otherwise must be length of payload
      // skip payload before continuing
      int payload_size = bytes_to_int_bitwise(buffer) - 2;
      input_file.seekg(payload_size, std::ios::cur);
    }
  }

  // parse buffer to get width and height
  std::vector<uint8_t> heightData(buffer.begin() + 1, buffer.begin() + 3);
  std::vector<uint8_t> widthData(buffer.begin() + 3, buffer.begin() + 5);

  int width = bytes_to_int_bitwise(widthData);
  std::cout << width << "\n";
  int height = bytes_to_int_bitwise(heightData);
  std::cout << height << "\n";
}Note: Code snippet DOESN’T check that it’s a valid JPEG image
WEBP
Another common image format, especially on the web, is the WEBP image format. It was originally developed by Google based on technology they had acquired during the On2 Technologies purchase. It’s a very recent image format, being initially released in 2010 and with the most recent specification being released in 2024 as RFC 9649.
Structure
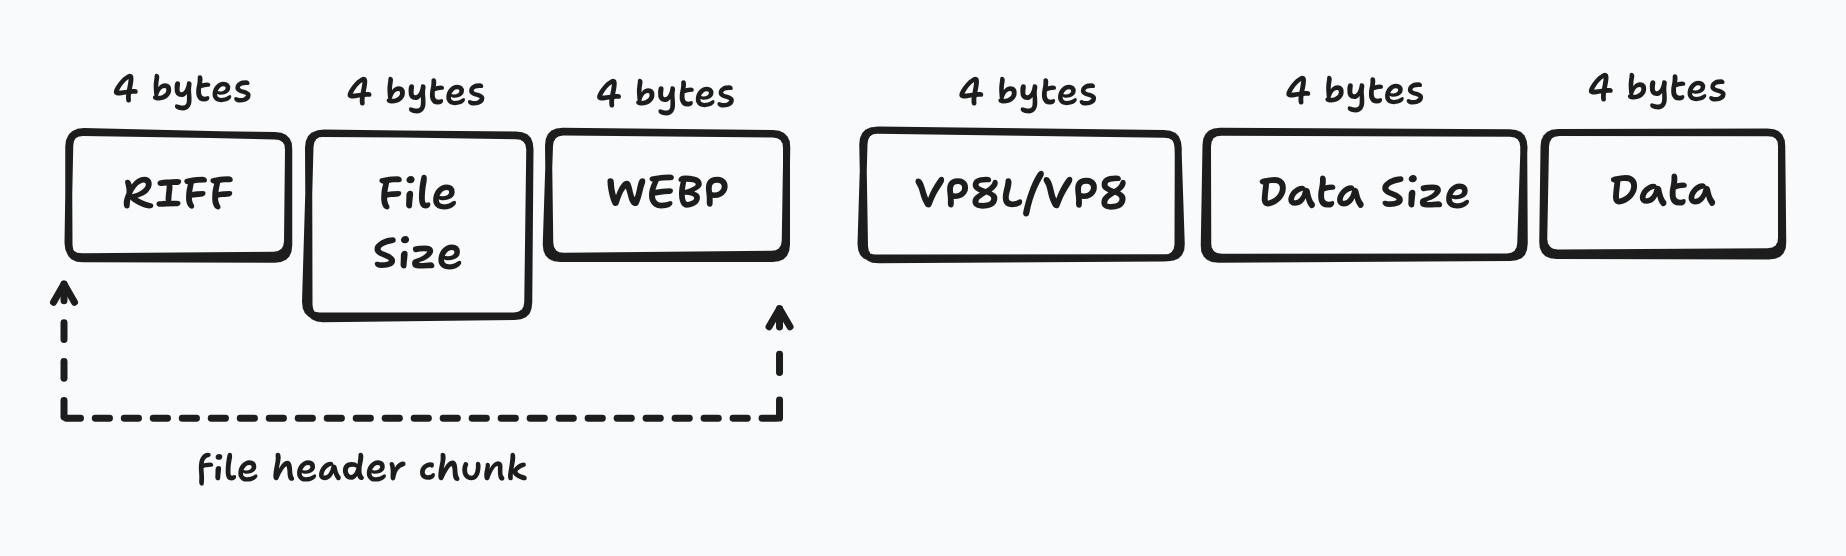
Similar to PNG, WEBP utilizes chunks based on the Resource Interchange File Format (RIFF). Each chunk has a 4 byte chunk identifier, 4 bytes for the length of the chunk payload, followed by n bytes of the payload.
There are multiple structures that WEBP might look like, and before you start getting PTSD from the JPEG section, it is a lot less complicated. Since WEBP supports both lossy and lossless compression, it has separate chunks for each: ‘VP8 ’ for lossy and ‘VP8L’ for lossless. Regardless of which chunk/compression, a simple file would look like the below graphic:
Most modern WEBP images, however, use the extended file format. The extension features a new ‘VP8X’ chunk, optional chunks like ‘ICCP’ for color profiles, and other ancillary chunks. The ‘VP8X’ chunk is the central chunk that defines other features and unlike the other VP8 chunks, DOESN’T contain the raw image data. As you might’ve realized, this means that there needs to be both a ‘VP8X’ chunk and a VP8/VP8L chunk for this extended format unless it’s an animation in which case you would have ‘ANMF’ chunks that store the data.

Important to note that chunks necessary for reconstruction and color correction must be in the following order: ‘VP8X’, ‘ICCP’, ‘ANIM’, ‘ANMF’, ‘ALPH’, ‘VP8’, and ‘VP8L’. Metadata and other unknown chunks may appear out of order as stated in the specification. Below the chronological order of what a WEBP file might look like with the extended file format.
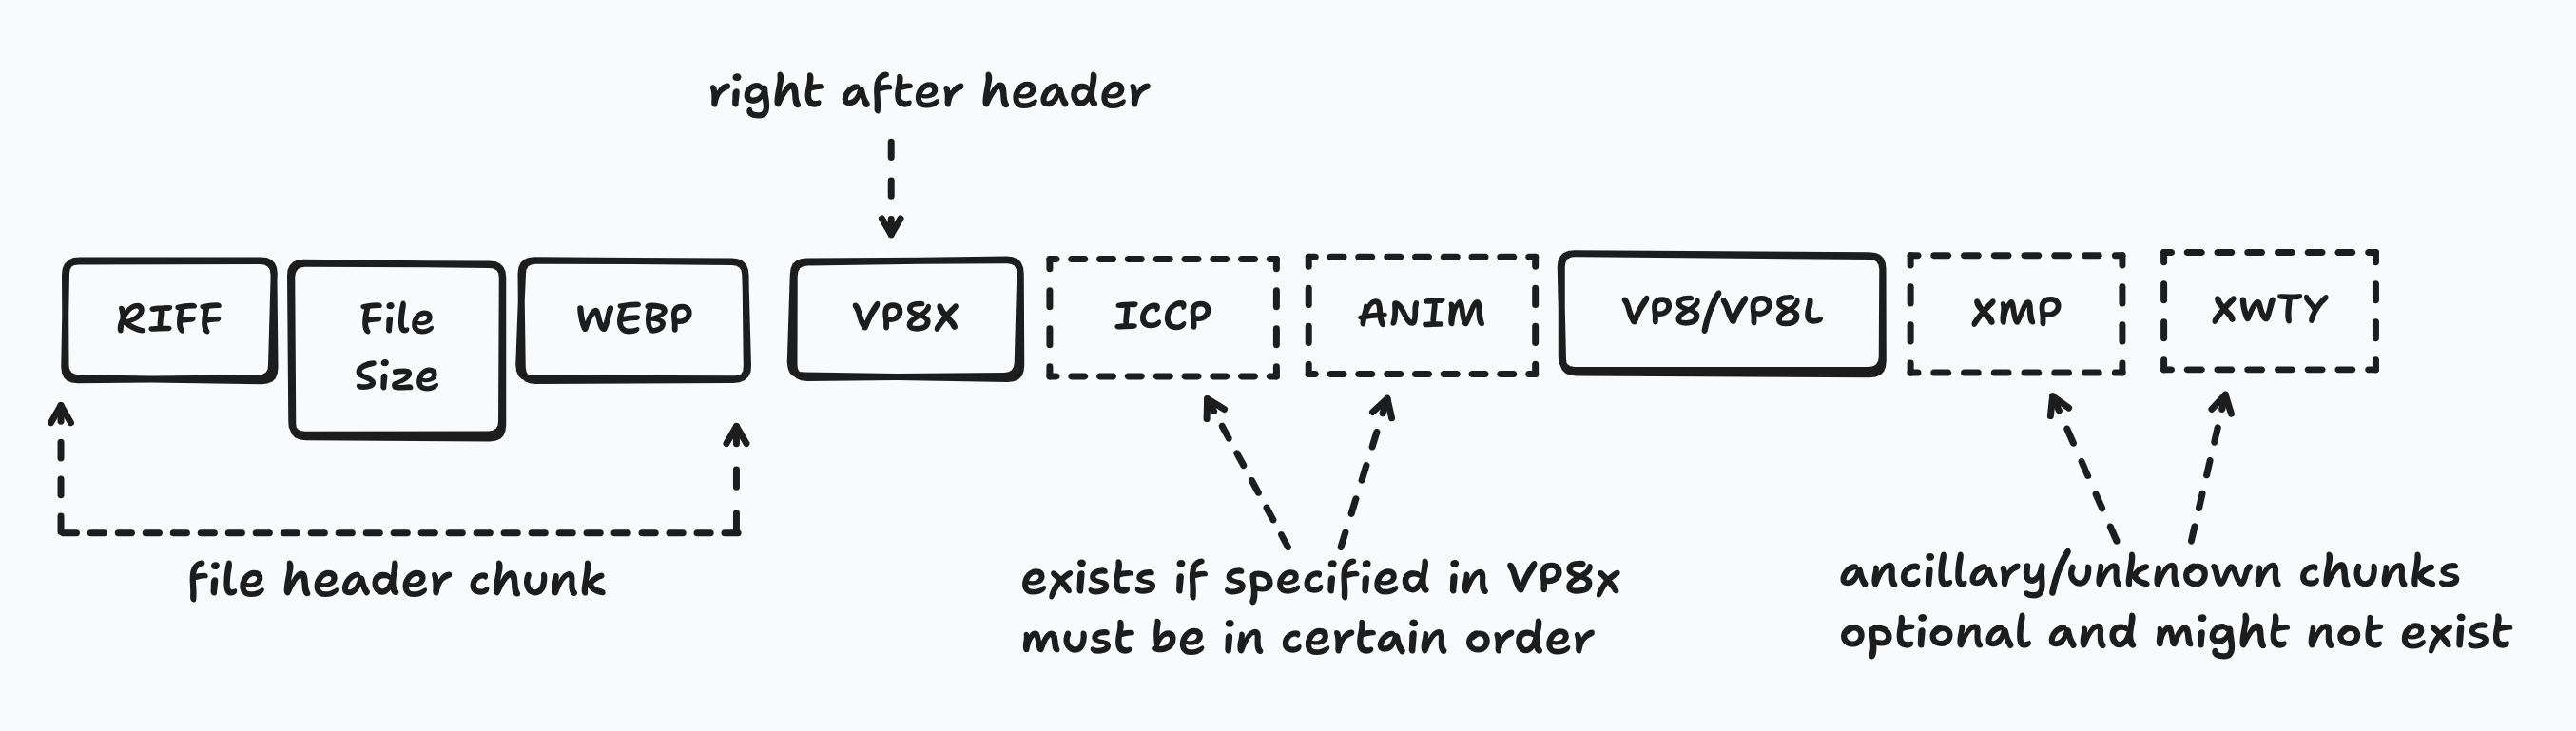
The specification also has a couple more examples and I recommend parsing through it quickly since it’s a relatively short read.
Parsing
Similar to the JPEG part, I’m going to be assuming that WebP format is using the extended file format version with VP8X. Feel free to add support for the VP8 and VP8L versions on your own as a learning exercise, but I don’t want to make my demo code any longer than it needs to be. Also note, unlike PNG and JPEG, WEBP uses little endian, so when transforming bytes to integers, remember to go in reverse!
void printImageDimension(std::string filePath) {
  std::ifstream input_file(filePath, std::ios::binary);
  // skip file signature
  input_file.seekg(12, std::ios::beg);
  // read which vp8 chunk it is
  std::vector<uint8_t> header(4);
  input_file.read(reinterpret_cast<char *>(header.data()), 4);
  // verify header then continue
  std::vector<uint8_t> vp8x_header({'V', 'P', '8', 'X'});
  if (header == vp8x_header) {
    // skip payload length and reserved bits
    input_file.seekg(8, std::ios::cur);
    // get width and height (next 6 bytes)
    std::vector<uint8_t> width(3);
    std::vector<uint8_t> height(3);
    input_file.read(reinterpret_cast<char *>(width.data()), 3);
    input_file.read(reinterpret_cast<char *>(height.data()), 3);
    std::cout << bytes_to_int_bitwise(width) + 1 << "\n";;
    std::cout << bytes_to_int_bitwise(height) + 1 << "\n";;
  }
}Note: Code snippet DOESN’T check that the image is a valid WEBP image!
Conclusion
Hopefully you learned the big picture of how images work and how they’re stored. Extracting the dimensions is a little niche, but it’s a universally required field for any image codec, so hopefully it serves as a good example as to how to parse images. There’s a bunch of other image formats, but you can follow the same general process to extract any information you would like.
Thanks for reading. Cya 👋.