
Fast And Lightweight Native Key Visualizer
There are 3 things that I love most in the world: Vim motions, Arch Linux, and my Moonlander split keyboard. They are also equally as confusing to most beginner developers. This confusion becomes viscerally visible when you’re running a workshop as all they see is a flurry of actions that seem to magically execute. What I believe is an effective solution in demystifying the “magic” is to have a program that displays the keys I press. This will leave a paper trail that people can better understand and correlate with the resulting actions that occur on my screen. I’m obviously not the first bloke that thought of building a key visualizer, so I tried a few programs. Some visualizers were fantastic, but none of them matched my exact needs from either a performance or UI perspective. Ultimately, I decided it was worth it to spend some time building my own which has been a very rewarding experience.
Configurable Display
Of course the main feature of a key visualizer is the display itself. There are some incredibly cool UIs that programs like KeyViz use where they display a replica key cap.
However, for my use case, it was much better to create a simpler UI so that it wasn’t as much of a distraction and would take up less screen space overall. In the end I settled on a basic 2D box with some padding along with the captured characters. An additional point that I prioritized was making the display easily configurable without having to recompile. Since the UI overall is simple, this meant being able to update the background color, text color and box padding.

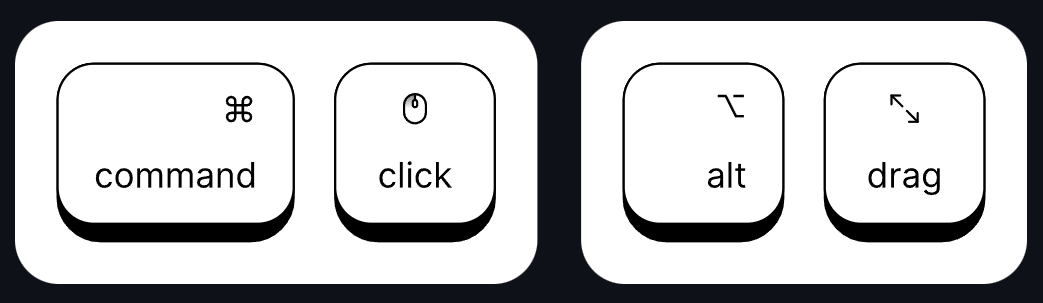
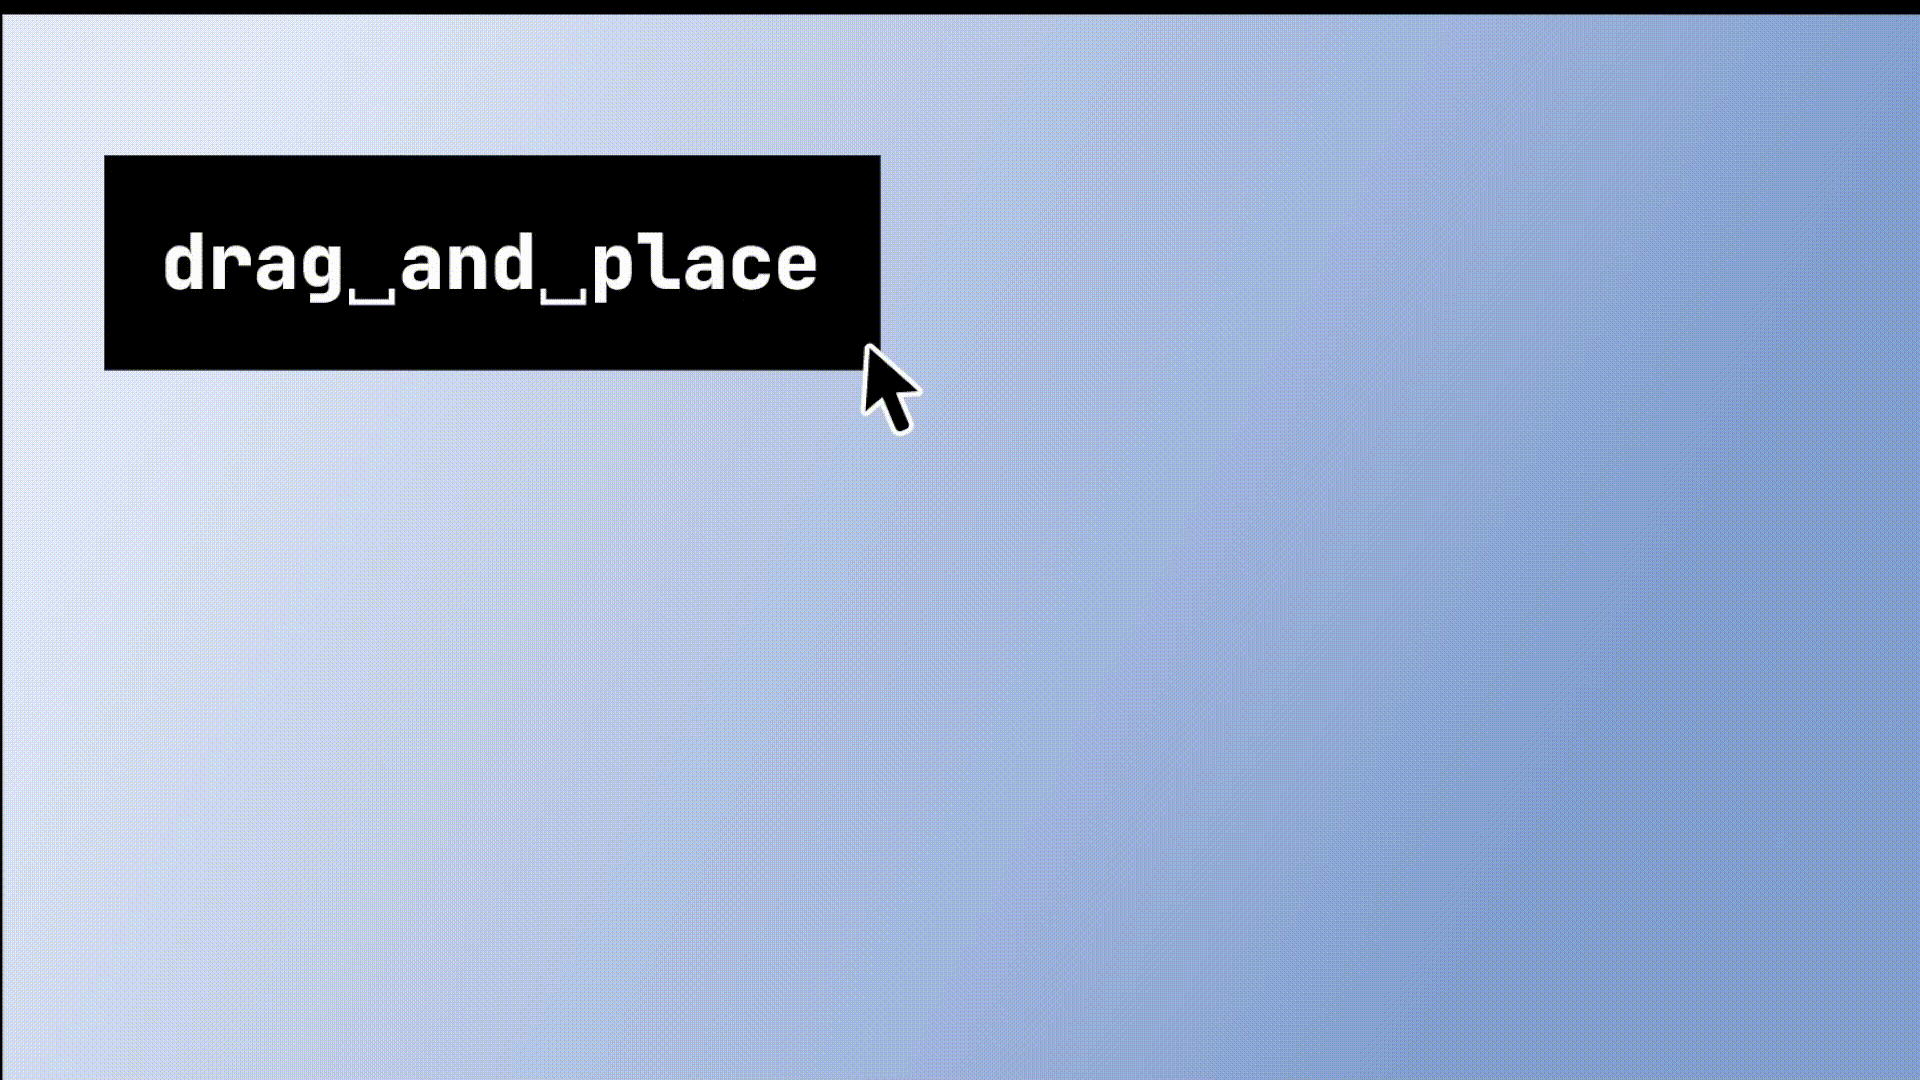
Drag & Drop
Rather than fiddling with the location of the visualizer through the settings, I thought it would be much easier to implement a drag & drop system where the user can simply drag the visualizer to exactly where they want to place it. The position would also be stored in the settings so that it persists between sessions.
Idle Timer
When testing out the program for a week, I quickly found that it was really annoying how the visualizer would persist even as I switched between applications. For example, between writing code and reading documentation, sometimes the visualizer would block the documentation text. This was especially bad for me because I blow up my text a lot when reading (my vision absolutely sucks). As such, I thought it would be smart to add a timer where it would hide the visualizer after a certain period of inactivity.

As with the other display parameters, the idle timer is also configurable.
Settings
The last main feature was adding a way to edit the settings. I arbitrarily chose JSON as the configuration format since I think people would probably be most familiar with it and I liked how I could nest objects. The standard C++ library doesn’t have a JSON parser, so I had the choice of either using a separate library or building my own. I decided to build my own parser since that seemed fun and I hadn’t done it previously. Below is a brief snapshot of what the parsing looked like.
class Json {
private:
    std::string data;
    size_t end;
    size_t ptr;
    void skipWhitespace() {...}
    JsonValue parseValue() {
        skipWhitespace();
        assert(ptr < end);
        switch (data[ptr]) {
            case 'n': { return parseNull(); }
            case 't': case 'f': { return parseBool(); }
            case '-': case '0': case '1': case '2': case '3': case '4': case '5': case '6': case '7': case '8': case '9': { return parseNumber(); }
            case '"': { return parseString(); }
            case '[': { return parseArray(); }
            case '{': { return parseObject(); }
            default: {
                throw std::runtime_error("Unexpected character");
            }
        }
    }
    JsonValue parseNull() {...}
    JsonValue parseBool() {...}
    JsonValue parseNumber() {... }
    JsonValue parseString() {...}
    JsonValue parseArray() {...}
    JsonValue parseObject() {...}
};
Essentially the parser would select an individual type to parse based on a token and some types, like objects, would then call the base parse function again in a somewhat recursive manner. After adding the parsing functionality, it was trivial to build the app settings struct to be used throughout the rest of the application.
I got a bit lazy about the settings interface, so the settings button is just going to open your desktops default text editor. I figured that if you’re cloning and building this project from scratch, you’ll be savvy enough to know how to edit some JSON.
Development Process
This concludes the run down of the features. Now, I’ll be delving into some of the weird, annoying, and fun parts of the development process that I haven’t covered previously. If you’re a mega nerd or recruiter, these next sections might be more interesting. Also a small note: I’ve never developed natively on Windows before, so don’t flame me too much if my solutions aren’t the best.
Keyboard Inputs
One of the first challenges was with capturing keyboard inputs at a global level. Win32 has a default callback function that runs whenever there’s an event message. However, from my relatively short experience, it wasn’t very reliable and had various edge cases that I didn’t want to handle. I found that a cleaner solution was to create a low-level hook that fetches the key strokes which allowed for a smoother global capture. The captured keys would then be processed by a separate callback function for the hook.

LRESULT CALLBACK KeyboardProc(int nCode, WPARAM wParam, LPARAM lParam) {
   if (nCode >= 0) {
        KBDLLHOOKSTRUCT *pKeyStruct = (KBDLLHOOKSTRUCT *)lParam;
        if (wParam == WM_KEYDOWN || wParam == WM_SYSKEYDOWN) {...}
    }
    return CallNextHookEx(hKeyboardHook, nCode, wParam, lParam);
}
Another tricky part was the virtual key translation. When the key strokes are captured, they aren’t captured as plain UTF characters. Rather, it’s represented as a UINT type known as a virtual key code. I initially tried manually mapping the key codes to unicode characters, but I quickly found out how inefficient that process would be. As such, I used the built-in unicode function that fetches the current keyboard layout for the translation process. For special keys where I wanted to override the unicode character, I simply created an overriding mechanism with a hash map.
std::wstring getStrFromVKey(UINT vKey, UINT scanCode, BYTE keyboardState[256]) {
    if (specialKeys.find(vKey) != specialKeys.end()) {
        return specialKeys.at(vKey);
    }
    wchar_t buffer[4];
    int result = ToUnicodeEx(vKey, scanCode, keyboardState, buffer, 4, 0, GetKeyboardLayout(0));
    if (result == 1) {
        return std::wstring(1, buffer[0]);
    }
    return L"";
}
Updated Graphics
As a complete Win32 noob, I initially used the gdi32 library for graphics. What I quickly found out was that it looked terrible, especially when it came to rounding elements. There was absolutely no aliasing which meant that anything not perfectly rectangular looked like pixelated blobs. I didn’t realize until halfway through the project that there were more advanced graphics libraries like gdiplus. At this point I was working on a mini UI library, so it took some time refactoring all the code to fit the gdiplus definitions. Afterwards though, my UI looked way smoother thanks to Gdiplus::SmoothingModeAntiAlias.
While I’m on the topic of graphics though, there were a couple of things that I wanted to point out.
- More of a stylistic choice, but it really, REALLY annoyed me when the original gdi32 library defined rectangles as {left, top, right, bottom}. Luckily gdiplus changes the definition to {left, top, width, height} which I think is way more intuitive and convenient to use.
- For god knows why, the color definition in gdiplus is ARGB instead of RGBA. Definitely spent way too long debugging a display issue before realizing I was just setting the alpha value to 0…
- One of the godsends of gdiplus is the automatic memory management. All objects are wrapped in a smart pointer which means that the allocated memory is automatically freed at the end of its lifetime. Very convenient since I don’t have to worry about memory leaks and reduced the verbosity of the code I needed to write.
- I experimented a ton with building a fairly extensive UI library. Unfortunately none of it ended up getting used (canon event), but I struggled with the verbose nature of having to account for multiple constructor methods. One solution that I found absolutely game changing was supporting a builder pattern. This meant that I could simply chain functions together after initialization, significantly reducing the amount of code that I would need to write.
- Going back to the gdiplus lifetime, I was wrapping classes containing gdiplus objects in my own smart pointers. This created a lifetime conflict since gdiplus would end first, freeing all the objects, before my own smart pointers could end. One technique that came in handy was Resource Acquisition Is Initialization (RAII). Basically, I would wrap the gdiplus lifetime in its own smart pointer and since C++ treats life time as a stack (last one initialized is the first one freed), my smart pointers would be freed first before gdiplus cleaned up the rest.
Scripts And Makefile
When I initially created my Makefile, I would just compile everything in one go whenever I needed to rebuild the project. That worked for the most part, however, at some point in the project, compiling everything was taking forever since some of the libraries were pretty heavy.
The compilation time was slowly eroding my sanity, so I finally decided to rewrite my Makefile. Instead of compiling everything, I split it into two steps: compiling source code to object files and compiling the object files into one executable. This sped up the compilation times by a ton since only the changed source files would get recompiled instead of the entire project. I don’t have the hard numbers for the improved compilation time, just know it was enough to make me sane again.
# compiling source to object
$(BUILD_DIR)/%.o: $(SRC_DIR)/%.cpp | $(BUILD_DIR)
	$(CXX) $(CXXFLAGS) -c $< -o $@

# linking objects into executable
$(EXE): $(OBJ) | $(BUILD_DIR)
	$(CXX) $(OBJ) $(CXXFLAGS) -o $(EXE)
As the last step, I also added an install and uninstall script that people can run. I know there are package managers out there that I can submit to, but it’s too much of a hassle (sorry). The scripts itself aren’t very interesting, but I did learn how Windows searches for applications and how it identifies shortcuts.
Conclusion
Doing a quick and very unprofessional benchmark, my CPU usage was around 1.4% less compared to an alternative visualizer. Likewise my memory usage was 1.4 MB compared to the 80 MB the alternative visualizer used. Take these results with a grain of salt since I just eyeballed the numbers through the task manager, but I’ll take that as a win since my original goal was to create something more lightweight. Overall, this project has been really fun to work on and I encourage more people to work on cool stuff even if it’s not a billion dollar business!
Thanks for reading. Cya 👋.