
Monkeytype In The Terminal
If you’ve ever wanted to test your typing speed or practice your accuracy, chances are you’ve come across monketype.com. At its core, the concept is simple: type a sequence of random words for a set amount of time, and when the timer ends you get stats like words per minute (WPM) and accuracy. Now, I consider myself a pretty fast typist, so I didn’t spend much time on Monkeytype—until I got my hands on a Moonlander split keyboard (my baby). Suddenly, I needed a way to retrain my muscle memory and adapt to the new layout. Monkeytype worked fine, but here’s the thing: I’m a Vim user. Opening a browser just to type some words? Slow, clunky, and bruises my fragile ego. That’s when I had an eureka moment: why not bring Monkeytype into the terminal? Plus it finally gave me an excuse to tinker with Go, which I’d been meaning to try.
Deciding The Features
The first step was figuring out what parts of Monkeytype I actually wanted to steal port over. Monkeytype has a ton of features—graphs, charts, different modes—but honestly, I didn’t care about most of them (sorry, WPM graph lovers). I just wanted the essentials. I narrowed it down to three core features:
- A typing box where I could practice.
- A settings page to configure the typing experience.
- An analytics page to show words per minute and accuracy.
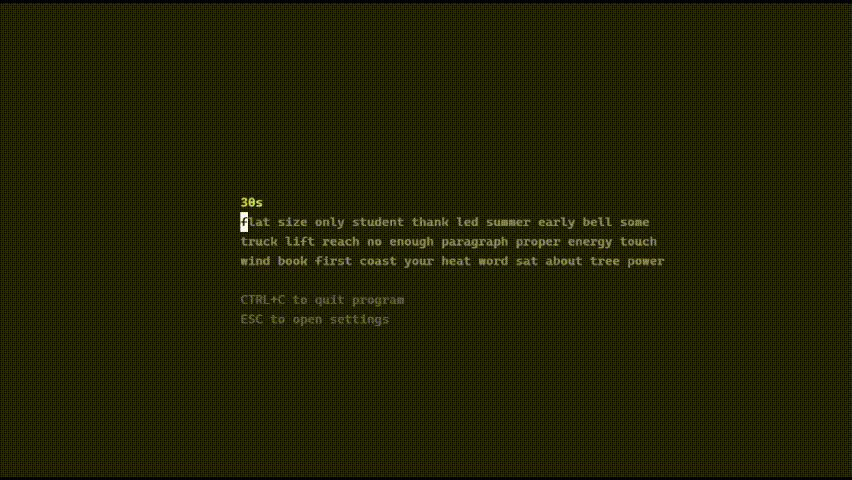
For the typing box, I basically wanted to clone Monkeytype’s structure: three visible lines of text at a time. Once you finish one line, it slides up and a new one appears below. I also wanted color indicators for correctness (white for right, red for wrong), along with support for backspace and typo correction.

Building It Out
With the feature list locked down, it was time to actually start building. I decided to use Go as the programming language, along with a terminal UI (TUI) framework called Bubble Tea—which, by the way, is absolutely amazing. For styling, I also pulled in Lip Gloss, another Go package that helps with styling terminal apps since I’m not a masochist and don’t enjoy manually typing out the necessary ANSI escape characters. Both libraries have fantastic documentation, so if you’re ever thinking about building a TUI app in Go, I can’t recommend them enough.
I won’t turn this into a full “How Bubble Tea Works” article, but here’s the quick version: Bubble Tea apps are modeled around a single state object (the model). That model gets updated through an update handler whenever events happen (like a key press), and then a view function renders the updated state into the terminal. Most of this project boiled down to manipulating and combining those three things: state, update, and view.

I’m not going to walk through every single step of the development process here—because let’s be honest, a lot of it would either be boring to read or turn this article into a novel. Instead, I want to zoom in on a couple of parts that I think you would find semi-interesting:
- Dynamically centering the text box content
- Handling text box events (and all the weird edge cases that come with it)
Dynamically Centering Textbox Content
In CSS, centering an element is as easy as slapping on a margin: auto or justify-content: center. Unfortunately, terminals don’t play that game. I had to manually calculate how to center the text box so it would scale nicely across different terminal resolutions.
The interesting thing about working in the terminal is that its “resolution” isn’t measured in pixels—it’s measured in characters. The width is how many characters fit across, and the height is how many characters fit vertically. That means you don’t need to worry about pixels at all; you just need to think in terms of character counts.
Borrowing a bit from my game dev background, the math is straightforward: to center an element A inside a screen S, you shift A down by half the height of S, and right by half the width of S, minus half the width of A and half the height of A respectively.
width := (screenWidth - elementWidth) / 2
height := (screenHeight - elementHeight) / 2
I applied this same logic to the typing box by setting its initial top and left padding, using blank space characters to give the illusion of centered content. But there were some quirks to handle:
- Random word lengths – Since each line is randomly generated, every line has a different length. I wanted the box to be centered, but the text itself to remain left-aligned. To solve this, I calculated the maximum number of characters per line and used that as the reference width for centering.
- Dynamic line generation – Each new line is only generated once the previous one is finished. That meant if a new line was longer than the previous max, recalculating the center each time would cause the entire box to “jump” sideways. Not great. My solution was to lock the textbox position after the initial calculation. If a new line ended up longer than the box, I just let it overflow a little.
- Why overflow is fine – The textbox width was set to 120 characters, so in practice you’d really have to zoom in or generate some monster words before overflow became noticeable. This trade-off kept the UI stable without introducing distracting re-centering shifts and without comprising the randomness of the words generated.
In the end, the effect worked really well: the textbox looks centered, the text is left-aligned, and the layout stays stable across different terminal sizes.
Textbox Event Handler And Edge Cases
One of the biggest lessons I took away from this project is that you don’t really understand a system until you try to build it yourself. What seemed like a simple typing app quickly spiraled into a rabbit hole of edge cases that I had never even thought about before.
Take spaces, for example. In MonkeyType, hitting space at the very start of a word skips that word entirely. Sounds simple, right? But then what happens if you hit backspace? Well, in MonkeyType, backspace will “undo” that skip only if the word was skipped—but if you had typed part of the word, backspace just deletes the last character instead.
The real challenge wasn’t just coding these behaviors individually—it was designing a flexible model that could handle every possible typing state without collapsing under its own complexity. You’ve got words being skipped, corrected, partially typed, fully typed, and mistyped, and all of these states interact with one another depending on how the user keeps typing. At one point, I had this tangled mess of conditionals where fixing one bug would create two new ones.
Eventually, I had to step back and think about it more like designing a finite state machine: every word could only be in one of a handful of states (e.g. untyped, active, completed, skipped, corrected), and every keystroke was just a transition between those states. Once I reframed it this way, I was able to cleanly model all the edge cases while keeping the update logic efficient enough to run smoothly in the terminal.
Quick Demo
There were plenty of other fun challenges I tackled during this project—like figuring out efficient rendering tricks in the terminal—that I never even got the chance to dive into here. But this article’s already getting long enough (at least by my standards), so I’ll wrap it up with the part everyone actually wants to see: a quick demo gif.
Thanks for reading. Cya 👋.